How to Change your Location when Browsing on Mac
The internet proves many benefits for users but alongside it has some problem which it poses. One of such problems is privacy issues. Even though there’s advancement in technology to combat this, there’s still an increasing rate of privacy and security issues. As you’ll want to stay protected on your Mac, you’ll want to have the right app to make you secured. ExpressVPN is one of such app and here, we’ll show you how to use it on your Mac to change your location.
How to Use the ExpressVPN Desktop App on Mac
First, you need to have the ExpressVPN app installed.
1. Once it is up and running, you will notice that the app has assigned a smart location for you.
2. You can actually choose a different location. You can do this by clicking the three dots menu button. You’ll see two options: Recommended and All Locations.

3. If you’ll like to choose an exact region for yourself, select All Locations. And next, select your preferred location.
Also, ExpressVPN allows you to save your favourite location.
How to Use ExpressVPN with Chrome on Mac
You can use ExpressVPN on Chrome through its extension. Here’s how:
First, you need to have the ExpressVPN app installed on your Mac. Next, you need to have the extension installed.
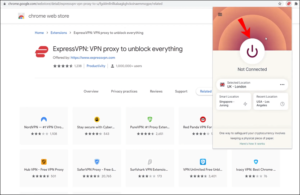
1. Open www.expressvpn.com/setup and select Google Chrome.
2. Select Get Extension and you’ll be taken to the Chrome store. In the Chrome store, click Add to Chrome. You’ll be asked to confirm, click Add Extension.
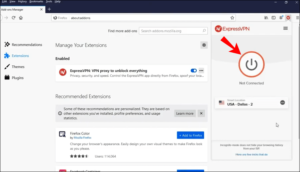
3. Next, click the ExpressVPN icon beside the address bar in the Chrome Browser. You’ll be assigned a smart location by default. Click the switch button and you’ll be connected to the VPN.
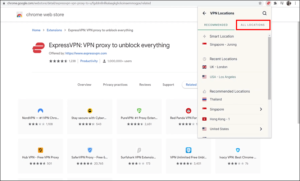
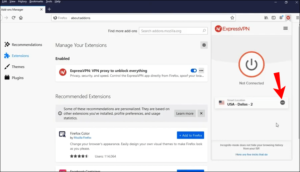
4. If you want to change your location, click the three dots menu. You’ll then see two options: Recommended and All Locations. To change you location to a specific region, click All Locations.
How to Use ExpressVPN with Firefox on Mac
There’s also an extension that ExpressVPN has for Firefox. Here’s how to use it on Mac.
First, ensure that you have ExpressVPN app installed on your Mac.
1. Go to www.expressvpn.com/setup and select Mozilla Firefox.
2. Select Get Extension and you’ll be taken to Firefox Add-ons. Select Add to Firefox. Confirm by clicking Add. Hit Okay, Got It on the next window.
Here’s how to use the extension:
1. Navigate to the right side of the address bar where you’ll find the ExpressVPN icon. Click it.
2. You’ll see a welcome screen. Follow the prompt.
3. ExpressVPN assigns you to a smart location. Select On to connect and click it again to disconnect.
4. You can change your location by clicking the three dots button where you will see two options: Recommended and All Locations. You can also search for a specific location by clicking All Locations.
Rounding Up…
You don’t want someone spying on you and tracking your browsing activities on your Mac, and that’s why you want to stay protected. We hope you found this helpful? If you did, kindly leave a comment and don’t forget to share.
You can also check out
How To Edit A Zoom Recording
How to Change your Background in Zoom
How to Change Your Name in Zoom Before a Meeting
How to Change Your Name in Zoom During a Meeting
How to Add Photos on TikTok
How to Know Those That Viewed Your Profile on TikTok
TikTok: How To Edit A Video Caption After Posting
How to Check NIN on MTN, Glo, Airtel and 9mobile
DStv Subscription Package, Prices with Channels
Startimes Subscription Package, Prices, And Channel List For Each Plan
GOtv Subscription Package GOtv Max, Jolli, Jinja and Lite Channel List and Price
GOtv Assigned Channel Number with Channel
GoTV Customer Service Contact, Social Media Handle & Email Address
StarTimes Customer Care Contact, Social Media Handle & Email Address
Top 5 Best Web Browsers for Android
Top 5 Best Music Player Apps for Android
Top 5 Best Alarm Clock Apps for Android
Top 5 Best eBook Reader Apps for iPhone and iPad
Top 4 Best VPN Apps for iPhone and iPad
Top 5 Best Apps for Monitoring Data on iPhone and iPad
Top 5 Best Translation Apps for iPhone and iPad
Top 5 Best Alarm Apps for iPhone and iPad
Top 5 Best Calendar Apps for iPhone and iPad
Top 5 Best Photo Editing Apps for iPhone and iPad
Hope with this, you have learnt How to Change your Location when Browsing on Mac.
Please share and like below, also comment below for any problem faced or encountered.