


How to Sort Emails by Filters on Gmail
Email is a great way to communicate and it has been a major way of business communication in this 21st century. It’s much formal than the social messaging platform that we know of. Emails are like modern letters, and they let you communicate faster and with more flexibility.
Gmail is one of those email platforms that has been existing for years now. The platform is also popular and most people that love the Google ecosystem would probably use it than other email platforms.
Gmail boasts of many features to give you a great experience while handling and sorting mails. With it, you can create filters that will automatically move emails to your specified location. In this guide, we first explore how to manually emails and then we go to how to automatically move them via filters.
Manually Move Emails to Tabs
Gmail has an auto-sorting system which sorts emails into default inboxes like Primary, Social, Promotions. If you want to force a particular email to always appear in your preferred inbox rather than the one Gmail send it to by default, you can do that easily. Here’s how:
1. Sign into Gmail on your desktop browser.
2. After logging in, simply click the inbox tab that has the email you want to move.
3. What you do next, is to simply drag that particular email to the tab you want it to be.

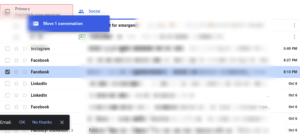
When Gmail recognises that you’ve done that, you will see a notification that tells you that the conversation was moved.
Gmail will then ask you if want same for future emails from that sender. Simply click Yes


Now, all future emails from that sender will automatically be sorted to the desired tab. However, if you want to do the same for existing emails, you’ll need to create a filter.
Automatically Move Emails to Tabs
Creating Filters in Gmail will help you automatically move emails to various inbox tabs as you desire. Here’s how to set it up:
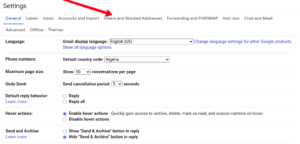
1. First, click the gear icon located at the top-right corner.
2. Go to the Quick Settings menu, and select See All Settings.
3. You’ll be taken to Gmail’s settings menu. There, click the Filters and Blocked Addresses tab.

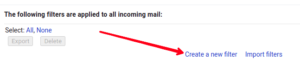
4. There are two sections. In the Filters and Blocked Addresses section. Navigate to the filter section, and click Create a New Filter.

5. This will bring up a new menu. In this menu, you can the details of the email you want to move. Here’s the layout:

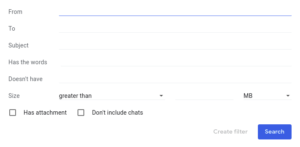
From: This is to tell Gmail the sender of the email
To: This will set the recipient of the email
Subject: What the subject looks like
Has the Words: For messages that have certain words
Doesn’t Have: Messages that don’t include certain keywords
Size: Emails larger or smaller in size that a certain size
Has Attachments: Emails having attachments
Don’t Include Chats: Chats to be excluded from the filter.
6. Once you have set all these parameters, hit Create filters.
7. What you want to do next is to specify the location you want the email moved to when your criteria are met. Locate the Categorise As option at the bottom of the window and select the checkbox beside it.
8. When you’ve done that, select the drop-down arrow which will bring up options you can select for the delivery location of the filter email.
This will only work for incoming emails. For it to work for existing emails, select the check box beside Also Apply Filter to # Matching Conversations.
After all that, hit Create Filter.
After doing all these, you’ll see an alert that you have created your filter.
Rounding Up…
Gmail is a powerful platform, no doubt. With a lot of features it packs that makes it so intuitive and with a great user experience, you can’t help but just fall in love with it. And then the sorting features…they are very useful. We hope you found this post helpful? If you did, kindly leave a comment and don’t forget to share.
You can also check out
How to Check NIN
How To Edit A Zoom Recording
How to Change your Background in Zoom
How to Change Your Name in Zoom Before a Meeting
How to Change Your Name in Zoom During a Meeting
How to Add Photos on TikTok
How to Know Those That Viewed Your Profile on TikTok
TikTok: How To Edit A Video Caption After Posting
How to Check NIN on MTN, Glo, Airtel and 9mobile
DStv Subscription Package, Prices with Channels
Startimes Subscription Package, Prices, And Channel List For Each Plan
GOtv Subscription Package GOtv Max, Jolli, Jinja and Lite Channel List and Price
GOtv Assigned Channel Number with Channel
GoTV Customer Service Contact, Social Media Handle & Email Address
StarTimes Customer Care Contact, Social Media Handle & Email Address
Top 5 Best Web Browsers for Android
Top 5 Best Music Player Apps for Android
Top 5 Best Alarm Clock Apps for Android
Top 5 Best eBook Reader Apps for iPhone and iPad
Top 4 Best VPN Apps for iPhone and iPad
Top 5 Best Apps for Monitoring Data on iPhone and iPad
Top 5 Best Translation Apps for iPhone and iPad
Top 5 Best Alarm Apps for iPhone and iPad
Top 5 Best Calendar Apps for iPhone and iPad
Top 5 Best Photo Editing Apps for iPhone and iPad
Hope with this, you have learnt How to Sort Emails by Filters on Gmail.
Please share and like below, also comment below for any problem faced or encountered.