


How To Make Your Profile Private On Facebook
Facebook is a social media platform that has a huge number of uers. That also means if your profile is set to public, the whole of Facebook can view your profile activities. And the thing is that Facebook sets your profile to public by default. What of if you want things private and you want to have more control over who sees your profile. Fortunately, Facebook allows you to do this. In this post we give a guide on how to make your Facebook profile private.
Make your Facebook Profile Private on Desktop
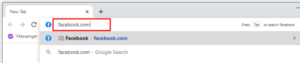
1. Launch the browser on your PC or Mac and visit www.facebook.com

2. Sign into your account if you’re not already logged in.

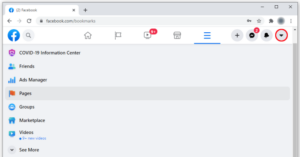
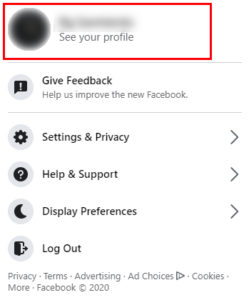
3. Locate the arrow icon which is always at the top right of the screen.
4. Click Settings

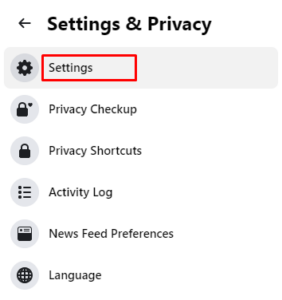
5. Navigate through the Settings menu and click Privacy. The Privacy tab will then be opened.

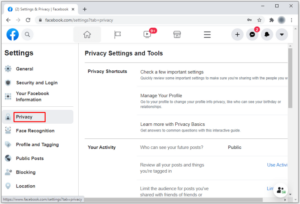
6. In this tab, you’ll have options to change various privacy settings.
7. Change the settings and you wish. Do this by selecting the blue Edit button beside the setting.

Make Your Facebook Profile Picture Private on Desktop
Any person who goes to your profile is first greeted by your profile photo, but you can change who has rights to view it. The following steps will guide you through it.
1. Log into your Facebook account if you’re not already signed in.
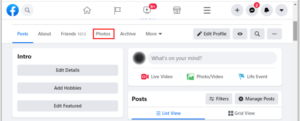
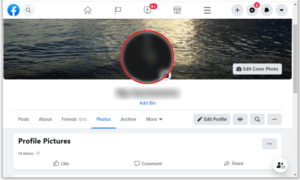
2. Tap your profile photo. It is always at the top right of the screen.

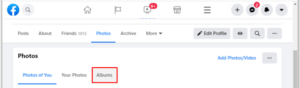
3. Check below the profile picture and you’ll see the Photos tab. Tap the tab.

4. Select Albums, then select Profile Pictures and finally, tap on your profile picture.


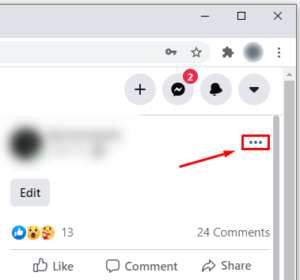
5. Tap the three dots menu beside the picture.

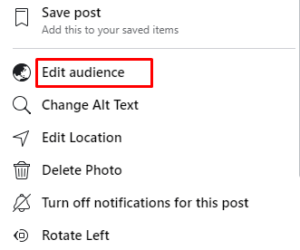
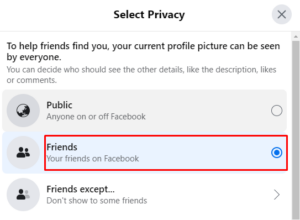
6. Select Edit Audience from the menu that drops down.

7. Select the settings you prefer. You can set who you want to see your profile picture. You may set only your friends etc.

Make Your Profile Private on the Facebook App
If you use the Facebook app on your phone, you can also adjust privacy settings for your profile there. Follow the steps below:
1. Launch the Facebook app on your Android or iPhone.
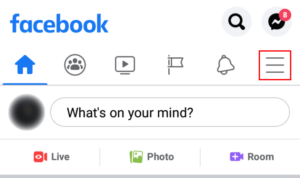
2. Tap the hamburger menu.

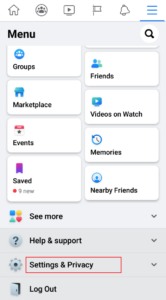
3. Scroll down the screen until you see Settings and Privacy and tap the Settings tab.


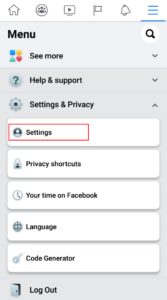
4. Find Privacy Settings below Privacy and tap it.

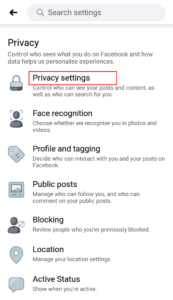
5. Tap Check a Few Important Settings

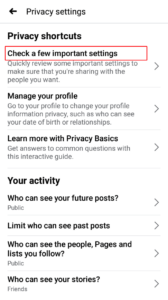
6. Under Privacy Checkup, select Who Can See What You Share.

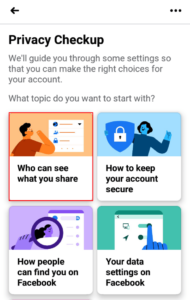
7. Tap Continue
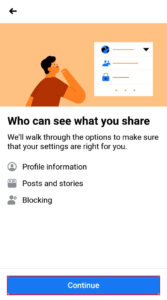
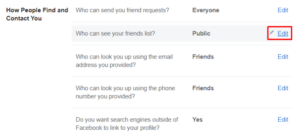
8. You can choose the option Friends which will cause only your Facebook friends to have access to your friend list.


9. Tap Next.
10. Tap the buttons beside Future Posts and Stories and change the setting to Friends.
11. Tap Next
Make Facebook Profile Content Private from Non-Friends
It is also possible to keep your profile content, and posts away from public view and from those who aren’t your friends. Follow the steps below to achieve this:
1. Launch your browser and Log in to Facebook.
2. Click the arrow which is present on the upper right of the screen.
3. Select Settings and Privacy
4. Select Settings
5. Click Privacy from the right-hand menu.
6. From the Your Activity section, locate Who Can See your Future Posts? . Tap the Edit button beside it
7. Click Public and select Friends.
So that’s it. With this guide you will be able to stop those prying eyes from spying into your profile any time they like. Isn’t this the privacy most of us want? Facebook let’s you achieve this with much controls.
You can also check out
DStv Subscription Package, Prices with Channels
Startimes Subscription Package, Prices, And Channel List For Each Plan
GOtv Subscription Package GOtv Max, Jolli, Jinja and Lite Channel List and Price
GOtv Assigned Channel Number with Channel
GoTV Customer Service Contact, Social Media Handle & Email Address
StarTimes Customer Care Contact, Social Media Handle & Email Address
Top 5 Best Web Browsers for Android
Top 5 Best Music Player Apps for Android
Top 5 Best Alarm Clock Apps for Android
Top 5 Best eBook Reader Apps for iPhone and iPad
Top 4 Best VPN Apps for iPhone and iPad
Top 5 Best Apps for Monitoring Data on iPhone and iPad
Top 5 Best Translation Apps for iPhone and iPad
Top 5 Best Alarm Apps for iPhone and iPad
Top 5 Best Calendar Apps for iPhone and iPad
Top 5 Best Photo Editing Apps for iPhone and iPad
Hope with this, you have learnt How To Make Your Profile Private On Facebook.
Please share and like below, also comment below for any problem faced or encountered.