


How to Sign an Email Attachment on Mac via iPhone or iPad
Some emails needs attached documents to be signed and if you’re sending this email on your Mac, this could pose a problem. The Mac trackpad may not do a great job of delivering a good signature. However, you can use your iPhone or iPad to draw this signature with a stylus and send it back to your Mac. This article shows you the way to do this.
To start the process, make sure your iOS/iPadOS and macOS devices are connected on the same iCloud account. With this Apple integration, you can seamlessly sync documents between various Apple devices. So double-check that your devices are in sync.
You should also get the attachmemt you’re about to sign ready. Do this by putting it in your email. Here’s how to do it: Locate the document and drag and drop it into the email from its location or click the paperclip icon (which is for attaching files) in the Mail toolbar or Select File > Attach Files from the menu bar.
Composing your email depends on you. You may decide that you want to compose it before signing or after signing. Let’s get to the steps of signing the document.
1. Move your mouse over the attachment and the Action arrow would come up.
2. Click the Action arrow and select Markup

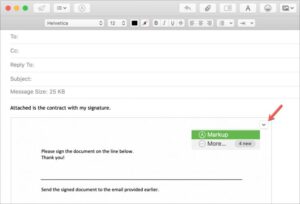
3. The document will appear in the markup window. Check the top right corner, you’ll see a tiny iPhone/iPad icon, click it to begin annotation. Should you have more than one iOS/iPadOS device, choose your preferred one.


4. When that is done, you’ll be able to view the document on your iPhone and iPad. Tap the Plus sign and choose signature. You’ll see the Plus sign at the bottom right corner.
5. Do the signing in the pop-up window. If it’s not fine by you, tap clear and do the signing again.
6. When you’re pleased with the signature, tap Done so that it would be inserted.


7. You can also drag the signature box to where you want on the screen. When you’re through, tap Done. The Markup window will close on your iOS device.
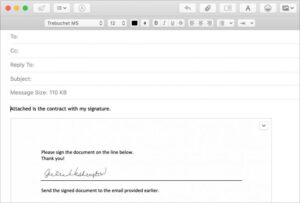
8. The document in Markup on your Mac will now have the signature you signed on your iPhone or iPad. If it’s okay by you, and you’re ready to send, click Done.


9. The document will be included in our email alongside your signature. Complete you email and you can now send.

You can also check out
Top 5 Best Web Browsers for Android
Top 5 Best Music Player Apps for Android
Top 5 Best Alarm Clock Apps for Android
Top 5 Best eBook Reader Apps for iPhone and iPad
Top 4 Best VPN Apps for iPhone and iPad
Top 5 Best Apps for Monitoring Data on iPhone and iPad
Top 5 Best Translation Apps for iPhone and iPad
Top 5 Best Alarm Apps for iPhone and iPad
Top 5 Best Calendar Apps for iPhone and iPad
Top 5 Best Photo Editing Apps for iPhone and iPad
Hope with this, you have learnt How to Sign an Email Attachment on Mac via iPhone or iPad.
Please share and like below, also comment below for any problem faced or encountered.