Windows Defender Settings (Tweak, Disable and Configure)
This tutorial will guide you all through all Windows Defender Settings and how to set them up
Turn on or off Windows Defender Real-time protection
1) Press the Window Button on the Keyboard or Click on Window logo at the lower left hand corner. (Click on Start). 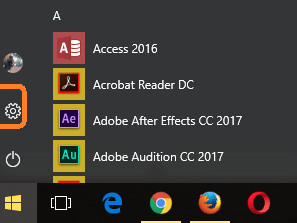 2) You will see the Settings Icon (it is marked red), click on it
3) The Settings Window will open.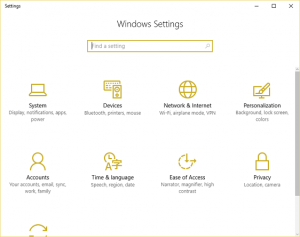
4) Click on Update and Security and then the Update and Security Window will open.
5) On the left hand pan,You will see Windows Defender, then click on Windows Defender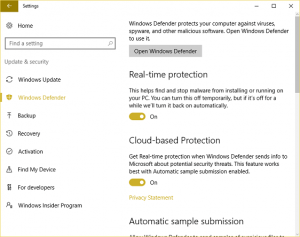
6) On the Windows defender Settings window, you will see Real-time protection, it is by default set to ON, to turn off, click on the ON and OFF button.
OR
7) On the notification area, expand it and click on the Windows Defender Icon, it will launch Windows Defender.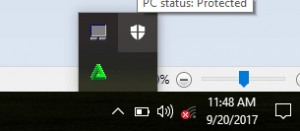
8) On the top right hand corner, Click on Settings.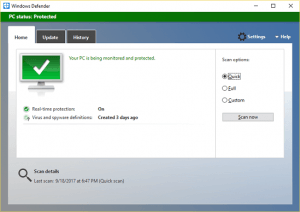
9) On the Windows defender Settings window, you will see Real-time protection, it is by default set to ON, to turn off, click on the ON and OFF button.
Turn on or off Windows Defender Cloud-based protection
1) Press the Window Button on the Keyboard or Click on Window logo at the lower left hand corner. (Click on Start). 2) You will see the Settings Icon (it is marked red), click on it
3) The Settings Window will open.
4) Click on Update and Security and then the Update and Security Window will open.
5) On the left hand pan,You will see Windows Defender, then click on Windows Defender
6) On the Windows defender Settings window, you will see Cloud-based protection, it is by default set to ON, to turn off, click on the ON and OFF button.
OR
7) On the notification area, expand it and click on the Windows Defender Icon, it will launch Windows Defender.
8) On the top right hand corner, Click on Settings.
9) On the Windows defender Settings window, you will see Cloud-based protection, it is by default set to ON, to turn off, click on the ON and OFF button.
Turn on or off Windows Defender Notifications
1) Press the Window Button on the Keyboard or Click on Window logo at the lower left hand corner. (Click on Start). 2) You will see the Settings Icon (it is marked red), click on it
3) The Settings Window will open.
4) Click on Update and Security and then the Update and Security Window will open.
5) On the left hand pan,You will see Windows Defender, then click on Windows Defender
6) On the Windows defender Settings window,scroll down, you will see Enhanced Notifications, it is by default set to ON, to turn off, click on the ON and OFF button.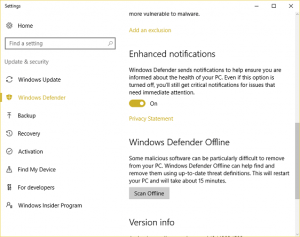
OR
7) On the notification area, expand it and click on the Windows Defender Icon, it will launch Windows Defender.
8) On the top right hand corner, Click on Settings.
9) On the Windows defender Settings window, scroll down and then you will see Enhanced Notifications, it is by default set to ON, to turn off, click on the ON and OFF button.
Prevent a file, folder or extension from been scanned by Windows Defender
1) Press the Window Button on the Keyboard or Click on Window logo at the lower left hand corner. (Click on Start). 2) You will see the Settings Icon (it is marked red), click on it
3) The Settings Window will open.
4) Click on Update and Security and then the Update and Security Window will open.
5) On the left hand pan,You will see Windows Defender, then click on Windows Defender
6) On the Windows defender Settings window,scroll down, you will see Add an Exclusion, Click on Add an Exclusion.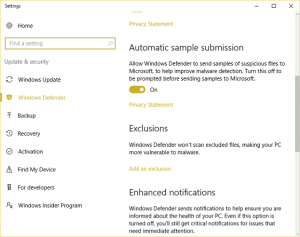
7) To add a file to exclusion, Click on Exclude a file, then go to the location of file and select it.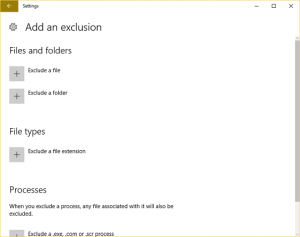
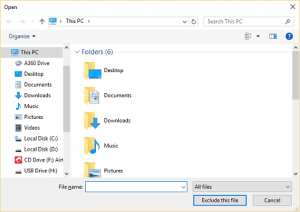
8) To add a folder to exclusion, Click on Exclude a folder, then go to the location of folder and select it.
9) To add an extension to exclusion, Click on Exclude a file extension, type in the extension and click on Add (examples of extensions are .exe, .zip, .mp4 etc.).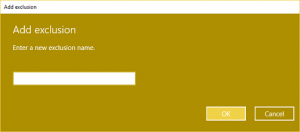
OR
10) On the notification area, expand it and click on the Windows Defender Icon, it will launch Windows Defender.
11) On the top right hand corner, Click on Settings.On the Windows defender Settings window,scroll down, you will see Add an Exclusion, Click on Add an Exclusion.
12)To add a file to exclusion, Click on Exclude a file, then go to the location of file and select it.
13) To add a folder to exclusion, Click on Exclude a folder, then go to the location of folder and select it.
14) To add an extension to exclusion, Click on Exclude a file extension, type in the extension and click on Add (examples of extensions are .exe, .zip, .mp4 etc.).
Turn on or off Windows Defender Automatic Sample Submission
1) Press the Window Button on the Keyboard or Click on Window logo at the lower left hand corner. (Click on Start). 2) You will see the Settings Icon (it is marked red), click on it
3) The Settings Window will open.
4) Click on Update and Security and then the Update and Security Window will open.
5) On the left hand pan,You will see Windows Defender, then click on Windows Defender
6) On the Windows defender Settings window, you will see Automatic Sample Submission, it is by default set to ON, to turn off, click on the ON and OFF button.
OR
7) On the notification area, expand it and click on the Windows Defender Icon, it will launch Windows Defender.
8) On the top right hand corner, Click on Settings.
9) On the Windows defender Settings window, you will see Automatic Sample Submission, it is by default set to ON, to turn off, click on the ON and OFF button.
Boot Time Scanning with Windows Defender on Windows 10 PC
1) Press the Window Button on the Keyboard or Click on Window logo at the lower left hand corner. (Click on Start). 2) You will see the Settings Icon (it is marked red), click on it
3) The Settings Window will open.
4) Click on Update and Security and then the Update and Security Window will open.
5) On the left hand pan,You will see Windows Defender, then click on Windows Defender
6) On the Windows defender Settings window,scroll down, you will see Windows Defender Offline, click on Scan Offline below (Remember it require system restart and takes about 15 minutes)
OR
7) On the notification area, expand it and click on the Windows Defender Icon, it will launch Windows Defender.
8) On the top right hand corner, Click on Settings.
9) On the Windows defender Settings window,scroll down, you will see Windows Defender Offline, click on Scan Offline below (Remember it require system restart and takes about 15 minutes).
Thanks for learning how to configure, tweak, enable and disable in Windows Defender. Thanks
saya sudah klik ospprearm tapi tidak bisa connect untuk mengaktifkan word and exel 2019
On this particular PC (ASUS CM6830) the Windows Defender will not run Off-Line unless I turn on BitLocker strange but true, I left BitLocker on for 5 weeks and ran 59 off-line scans.
Disabled it and Defender off-line will not work, goes through the steps till it reboots, the rectangular box comes on for 2 seconds and the computer will restart.
Thinking maybe something was wrong, I formatted my Hard drive and re-installed just Window 10 Pro with all the updates needed to date, ran Defender Off Line, to no surprice same thing, strange as this is the only PC that does this, that is 1 out of 3
This is quite rear, I have not come across this.