How to Disable or Enable Windows Defender or Windows Security Virus & Threat Protection in Windows 8.1 and Windows 10.
How to Disable Windows Defender or Windows Security Virus & Threat Protection
1. Launch Windows Defender/ Windows Security. Press the Window Button or Start Button and search for Windows Defender / Windows Security
OR
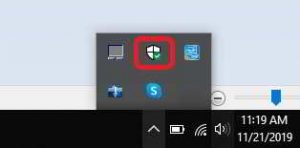
Go to the notification area, and click on the Windows Defender Notification symbol (Where the red box is shown).
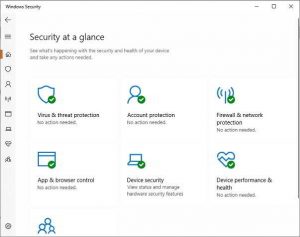
2. A Window will open, Windows Security
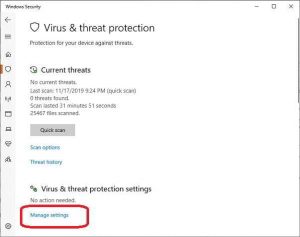
3. Click on Virus & threat protection.
4. Check down to the Virus & threat protection settings,then click on Manage Settings (Where the red box is shown)
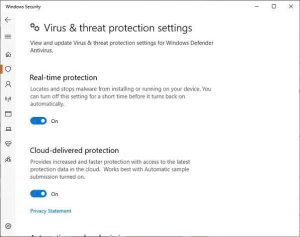
5. You can toggle OFF the settings, either Real-time protection, cloud-delivered protection and Automatic Sample submission.
How to Disable Windows Defender or Windows Security Virus & Threat Protection
1. Launch Windows Defender/ Windows Security. Press the Window Button or Start Button and search for Windows Defender / Windows Security
OR
Go to the notification area, and click on the Windows Defender Notification symbol (Where the red box is shown).
2. A Window will open, Windows Security
3. Click on Virus & threat protection.
4. Check down to the Virus & threat protection settings,then click on Manage Settings (Where the red box is shown)
5. You can toggle ON the settings, either Real-time protection, cloud-delivered protection and Automatic Sample submission.
Hope with this, you have learnt How to Disable or Enable Windows Defender Virus & Threat Protection.
Please share and like below, also comment below for any problem faced or encountered.
windows security
Yes. Thanks