


How to Password Protect Photos on iPhone and iPad
There are photos of ours that are private, that we don’t want others to see. We don’t want those browsing through our camera roll to stumble on these photos so we desire to have a way to hide them. Yes, it’s possible to hide photos on iPhone but hidden photos are moved to a secret album which can still be accessed by anybody making it not so secure. A great way to secure your photos is to password-protect them.
While iOS doesn’t have a native function for password-protecting photos, there is workaround to do so. In this guide, we take you through the process of using the Notes app on your iPhone to password-protect photos.
How to Password Protect Photos Using Notes
To start, move the photos you want password protected to your iPhone if they’re not there yet. When the photos are ready, do the following below:
1. Launch the Notes app, and tap the pencil and paper icon which represents New Note to create a new note.

2. On the new note, type some text that won’t attract attention. This text will be part of the list of note, after you have the note locked.


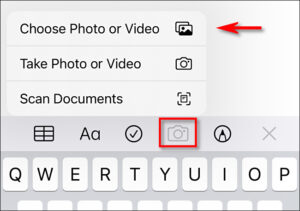
3. Locate the Add Photo icon which looks like camera. iPhone users will see this either above the on-screen keyboard or at the bottom of the screen. iPad users will see this at the top.
4. A menu will be displayed, select Choose Photo or Video.

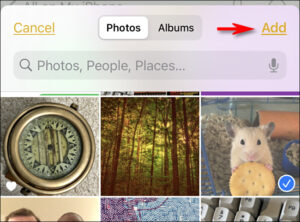
5. The next screen that opens will display thumbnails of photos you can add. Choose the photos you want to lock. You can identify that they are chosen by a checkmark which will appear.
6. When you’re done with the selection, tap Add. The photos will be added to the note you’re creating.

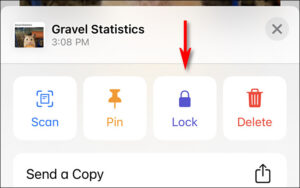
7. Lock the note by tapping the Ellipsis icon (can be identified by three dots in a circle).

8. In the next window that shows up, tap Lock.

8. If you have a Notes password set already, Notes will ask you to type it and after that, tap OK.
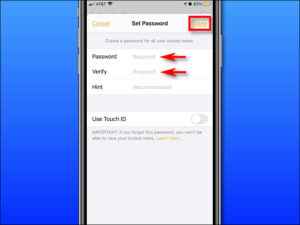
9. If you don’t have a password set yet, Notes will prompt you to create one. Just know that this password will be required to view all locked notes. If your Notes app is set to sync to iCloud, this same password will also be needed on other Apple devices signed in to iCloud.
10. Input a password and set a hint. If your device has Touch or Face ID, you can also lock Notes using them. Once you’re through with entering your details, tap Done.

11. Note will give you a confirmation of the lock added, but hold on. This confirmation only enables the lock settings – you’ll still have to set the note itself to be locked.
12. To do this, open the note, locate the Padlock icon in the toolbar and tap it.

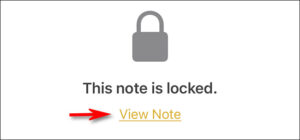
13. There will be a confirmation message that says “This note is locked”. To confirm by yourself, simply tap View Note.

14. When Notes request your password, enter it and type OK.


All the photos inside the secure note that you added will be shown. Ensure you go to the Photos app and delete the photos that you just password-protected. When you’re done with that, go to the Recently Deleted folder in Photos and delete those photos there too.
Move Photos From Notes to Photos App on iPhone
Whenever you wish, you can unlock the photos you password-protected moving them from the Notes App to Photos App. To do this:
1. Launch the Notes app, and open the Note you hid your photos in.
2. When the next screen opens, tap View Note.
3. After that, tap Enter Password and input it, and click OK.
4. When the locked note opens, tap the Share icon. You’ll see this share option at the top-right corner of your screen.
5. When the share menu shows, navigate down and tap Save Images option.
The photos will be saved back to the Photos app of your iPhone or iPad.
You can also check out
Top 5 Best Music Player for iPhone and iPad
Top 5 Best eBook Reader Apps for iPhone and iPad
Top 4 Best VPN Apps for iPhone and iPad
Top 5 Best Apps for Monitoring Data on iPhone and iPad
Top 5 Best Translation Apps for iPhone and iPad
Top 5 Best Alarm Apps for iPhone and iPad
Top 5 Best Calendar Apps for iPhone and iPad
Top 5 Best Photo Editing Apps for iPhone and iPad
Hope with this, you have learnt the How to Password Protect Photos on iPhone and iPad.
Please share and like below, also comment below for any problem faced or encountered.