

How to Enable or Disable Visualization on VLC Media Player
This will guide you on How to enable or disable Visualization for Audi files on the VLC Media Player.
Visualization is any technique for creating images, diagrams or animations to communicate a message (audio file).
When you play audio files on popular audio players like Winamp, you get some visualization.
The VLC Media Player comes inbuilt with four (4) visualization, they are Goom effect, libprojectM effect, Visualizer filter, 3D OpenGL spectrum visualization.
The automatic mode for the visualization enables any of the effect, that is among the four effects (Goom effect, libprojectM effect, Visualizer filter,3D OpenGL spectrum visualization).
By default, Visualization is disabled on VLC Media Player, This will guide You on How to enable visualization on VLC Media Player.
Enable Visualization on VLC Media Player
- Launch VLC Media Player
-
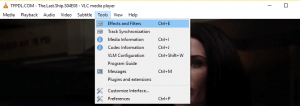
On the menu bar, Click on Tools, then click on Preferences OR Press CTRL + P on your keyboard.
-
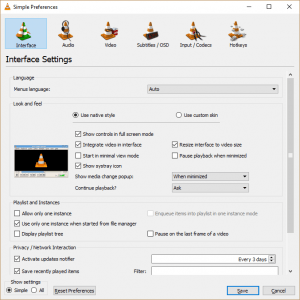
The Preferences window will open.
-
On the top menu Click on Audio and Scroll down to Visualization


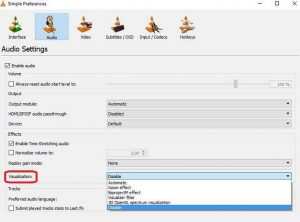

- Scroll down and select any of the visualization (Goom effect, libprojectM effect, Visualizer filter,3D OpenGL spectrum visualization) or Select Automatic to shuffle between the Visualization effects.
Disable Visualization on VLC Media Player
- Launch VLC Media Player
-
On the menu bar, Click on Tools, then click on Preferences OR Press CTRL + P on your keyboard.
-
The Preferences window will open.
-
On the top menu Click on Audio and Scroll down to Visualization
- Scroll down and click on Disable.
Hope, with this you have been able to Enable or Disable Visualization on VLC Media Player in order to effectively enjoy your VLC Media Player experience.
Please comment below for any issues faced while going through this process.