

Resize Multiple Images Using IrfanView. How to carry out Batch, large or bulk resize of many or bulk images using IrfanView.
Pictures and images are great, they are a part of us. From the days of analog cameras to digital cameras, we have always love photograph, Images and Pictures.
Now, we are in the days of Selfies and Quality and Efficient cameras like the DSLR ( ) which produce image at a larger resolution, larger file size and better quality.
But then, we are faced with a problem, storage and compatibility to lower end devices. Most especially storage of images have now left us to the extent of removing irrelevant metadata from objects or images as the case is here. So in order to reduce the file size of Images, one of the things that could be taken into consideration is resizing the images, this will reduce the file size but maintain quality of images.
Also check out to carry bulk or batch resizing of images using Adobe Photoshop
Today we will looking at how to resize bulk images using IrfanView.
1) Let’s go and get IrfanView, You can get it by Clicking on this Link (IrfanView).
2) After downloading the program, you install it on your computer System.
3) Then you launch the program, IrfanView.

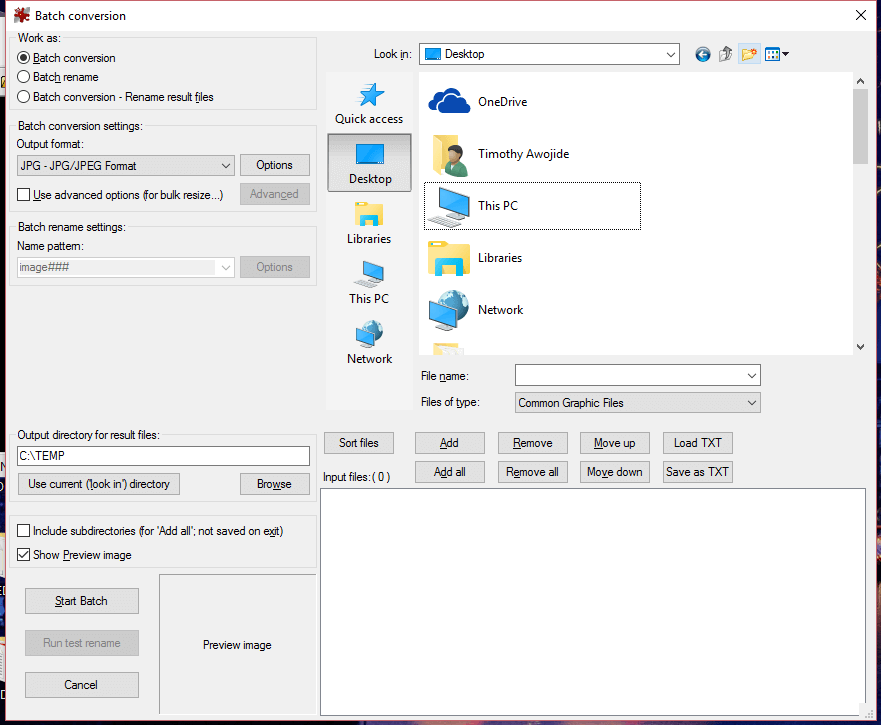
4) On the Menu bar, Click on File and then go down and Click on Batch Conversion or Rename OR you could press B on your keyboard to Launch Batch Conversion or Rename.

5) A window will open, Batch Conversion.

6) To carry out batch, large or bulk resize of various images, go down and check use advanced options (for bulk resize).
7) Then You Click on Advanced.

8) A window will open, Set for all Images, Check RESIZE in the window and enter preferred width or height of image required. (The default is in Pixels, you can also select cm or inches)

9) After entering desired width and height, you could also check and other settings that might favour your image by trying it out, then Click on OK
10) Then next when you return to the Batch Conversion Window, You can set it to either Batch Conversion, Batch Rename or Batch conversion and Rename and then you select the output format.

TIP: You can click on Add below, then go to another location to get other images.
12) Then go to Output directory for result files and click on Browse below, to select where resize images to be kept.
13) Then Click on Start Batch.
14) The Batch Conversion done window will open, then it show the process, till it completes the resizing.

Hope with this, you have been able to carry out Batch, large or bulk resize of many or bulk images using IrfanView.
Please share and like below. Also comment below for any problem faced.